after long time collecting and testing many sophos kb i'm developer my procedure and work really good.
The way and solution is simple:
so there are 3 steps that you must care when you plan implementing the sophos sso, following:
1: Firewall configuration
2: Active directory configuration/ gpo configuration
3: Workstation configuration
following the detail about those this steps:
for 1: Firewall configuration
create a user domain admins for the procedure inside firewall:
- create a connection association
- Import user groups for sso
for 2: Active directory configuration/ gpo configuration
After install the stas sso sophos xg software for autentication correctly you mus do:
grant firewall permission on AD server (if firewall is enable)
TCP port 5566 inbound and outbound
UDP port 5566,6060 and 6677
for wmi execution from stas you need do that:
Configure Windows Firewall using Group Policy
1.Launch the Group Policy Editor:
GUI:Go to Start Administrative Tools > Group Policy Management.
Command Line: Go to Start > Run. Enter gpmc.msc and click OK
2.Expand Domains > Domain Name > Group Policy Objects. Select the GPO that applies to the machines you need to allow WMI requests to query, and click Edit
3.Expand Computer Configuration > Policies > Administrative Templates > Network > Network Connections > Windows Firewall > Domain Profile. Select Domain Profile if the management console is in the domain; otherwise, select Standard profile.
Double-click Windows Firewall: Allow inbound remote administration exception to open its properties window.

Select Enabled to enable the Windows Firewall Rule and click OK to save the settings. You can also lock the incoming IP addresses down to only allow the queries from the your Domain Controller IPs, if desired.

there are 3 event id that must be in log on this step:
they are:
Event ID 4634 - An account was successfully logged off
Event ID 4624 - An account was successfully logged on
Event ID 4768 - A Kerberos authentication ticket (TGT) was requested
For Event ID 4634 and ID 4624 you must do that:
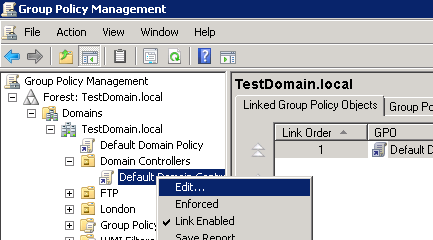
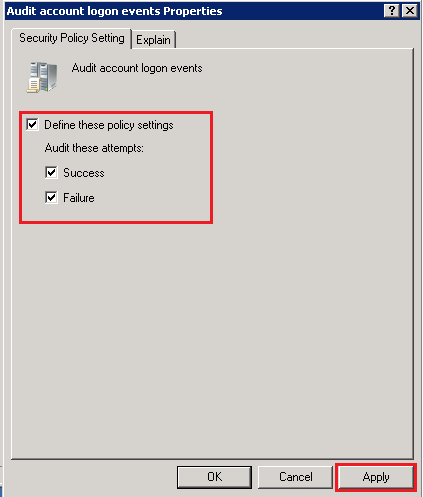
Go to Start > Administrative Tools > Local Security Policy to view Security Settings. Browse to Security Settings > Local Policies > Audit Policy and double click on Audit account logon events to view the Audit account logon events Properties window.
Enable the Success and Failure logon events, as shown in the screen below.


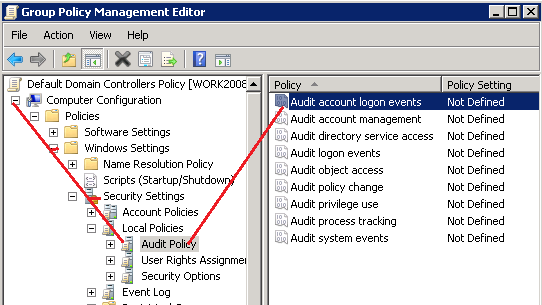
Expand Computer Configuration, and go to the node Audit Policy (Computer Configuration\Policies\Windows Settings\Security Settings\Local Policies\Audit Policy).
Double-click on the policy setting Audit logon events, check Success and Failure audit, and click OK

For Event ID 4768 - A Kerberos authentication ticket (TGT) was requested
Obs, over all kb from sophos there no commented that is necessary log this event id 4768 and there no is mentioned how is possible configure this event id for log on the server:
To enable event id 4768 in every Domain Controller, We need to configure audit settings in Default Domain Controllers Policy, or you can create new GPO and links it to the Domain Controllers OU via GPMC console, or else you can configure the corresponding policies on Local Security Policy of each and every Domain Controller..
Follow the below steps to enable Active Directory Kerberos Logon Audit event 4768 via Default Domain Controllers Policy.
Press the key 'Window' + 'R'
Type the command gpmc.msc, and click OK.
Note: Skip the above steps by clicking Start -->Administrative Tools -->Group Policy Management.
Expand the domain node and Domain Controllers OU, right-click on the Default Domain Controllers Policy, then click Edit.
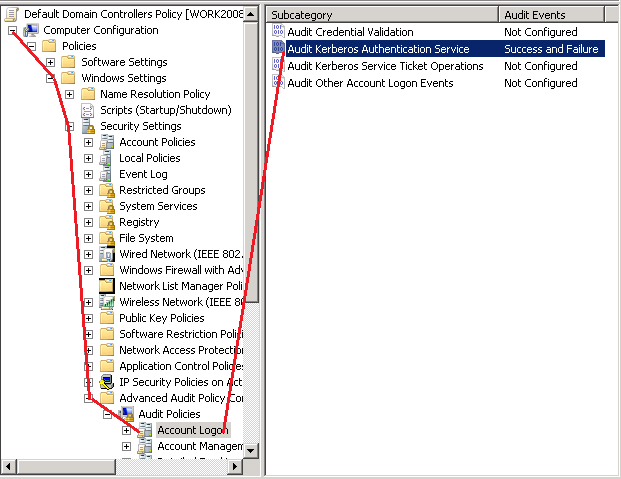
Expand Computer Configuration node and Security Settings and navigate to the node Audit Policy (Computer Configuration->Policies->Windows Settings->Security Settings-> Advanced Audit Policy Configuration -> Audit Policies->Account Logon).
In right-side pane, double-click on Audit account logon events and set Success and Failure setting to enable kerberos logon event 4768.
Note: In Windows 2008 R2 and later versions, you can also control this event by subcategory-level setting via Advanced Audit Policy Configuration.
Expand Computer Configuration and Security Settings and navigate to the node Account Logon (Computer Configuration->Policies->Windows Settings->Security Settings-> Advanced Audit Policy Configuration -> Audit Policies->Account Logon) and set the setting Audit Kerberos Authentication Service as Success and Failure
for 3: Workstation configuration
When performing the test, STAS displays the "remote procedure call failure" error, to solve the problem follow the procedures below.
New user profile
The user profile is a collection of settings that make your computer look and function the way you want it to. It contains settings for desktop backgrounds, screen savers, pointer preferences, sound settings, and other features. Due to this variety of personal settings and changes caused by other programs can happen to corrupt the user profile or malfunction in the use of the system, so the need for a new profile.
1. Press the Windows + X keys, Control Panel;
2. Click User Accounts and Family Protection;
3. Click User Accounts;
4. Click Manage Another Account;
5. Now click on Add a new user in the computer settings;
6. Add the name to the new profile and add it as administrator.
Test and see if the behavior repeats, if the behavior continues, perform the next procedure.
Clean Boot
Clean boot is used to determine if a background program is interfering with the system.
Press the Windows + R keys, type MSconfig and click Ok;
In the System Configuration window, click the services tab;
At the bottom of the screen check the Hide All Microsoft Services box and click Disable All;
Now click the Programs Initialization tab and click on Open Task Manager;
In the task manager window on the boot tab, disable all non-Microsoft programs, close the task manager, and then click ok in system setup and restart the computer if prompted.
NOTE: This disables all third-party services and programs. You can later, if the problem is solved in this way, enable the programs and services that will be started with Windows selectively instead of keeping them all disabled. If the problem comes back after enabling the initialization of a specific service or program, the problem is exactly with that software and it is advisable to remove it.
If the behavior continues, perform the next procedure.
Run Dism and Scannow repair tools.
These tools are diagnostic and aid in the repair of the system image.
Press the Windows + X keys, select Command Prompt (Admin), copy and paste the commands below and press enter after each command.
Sfc / ScanNow
Dism / Online / Cleanup-image / RestoreHealth
Test and see if the behavior repeats, if the behavior continues, perform the next procedure.
Run the CHKDSK tool
Chkdsk.exe is the command line interface for a program that checks the logical integrity of a file system in Windows. When CHKDSK encounters logical inconsistencies, it performs actions to repair file system data as long as it is not in read-only mode.
Click Start, on the search bar type CMD right-click on the application and select the Run as administrator option.
Now copy and paste the command below.
chkdsk / f / r / x / b
Note: You will receive a message that "CHKDSK can not be run because the volume is in use" press S to confirm and press Enter and restart the computer. Before starting the operating system will check, this procedure may take a few minutes wait until it is finished.
Test again and see if the behavior repeats itself.
Press the Windows + X keys, select Command Prompt (Admin), copy and paste the commands below and press enter after each command.
create a bat file with this information:
@echo off
netsh advfirewall firewall add rule name="Open Port 139" dir=in action=allow protocol=TCP localport=139
netsh advfirewall firewall add rule name="Open Port 1070" dir=in action=allow protocol=TCP localport=1070
netsh advfirewall firewall add rule name="Open Port 135" dir=in action=allow protocol=TCP localport=135
netsh advfirewall firewall add rule name="Open Port 445" dir=in action=allow protocol=TCP localport=445
netsh advfirewall firewall add rule name="Open Port 69" dir=in action=allow protocol=TCP localport=69
netsh advfirewall firewall add rule name="Open Port 137" dir=in action=allow protocol=TCP localport=137
netsh advfirewall firewall add rule name="Open Port 138" dir=in action=allow protocol=TCP localport=138
netsh firewall set service REMOTEADMIN enable
net start RpcLocator
net start wmiApSrv
net start WinRM
net start Winmgmt
net start Spooler
net start RpcSs
net start lmhosts
net start SSDPSRV
echo.
exit%uFEFF
execute on the computer the bat file
Enable these windows services.msc to start automagically, it took me a while to get it running as well:
Remote Procedure Call (RPC)
Remote Procedure Call (RPC) Locator
Remote Registry
Secondary Login
Windows Management Instrumentation
Windows Remote Management (WS-Management)
sources:
http://www.morgantechspace.com/2014/05/Event-ID-4768-A-Kerberos-authentication-ticket-was-requested.html
https://community.spiceworks.com/topic/285215-wmi-access-denied
Nenhum comentário:
Postar um comentário